
Administering Canvas Quizzes with Respondus LockDown Browser
Overview
The Respondus LockDown Browser (LDB) is a restricted web browser used to aid in assurance of the academic integrity of quizzes and exams administered using the Canvas quiz activity. When students access exams through LDB, they are prevented from performing certain actions such as launching other applications, switching to other windows, opening unapproved websites, and printing or copying test questions.
Best Practices for Faculty Using LockDown Browser
Syllabus
- Include a statement regarding the requirement to use Respondus LockDown Browser.
- Include technical requirements appropriate for the features you plan to use. For example, if you plan to use Respondus Lockdown Browser with Monitor, include the need for a microphone and webcam.
- Include a statement on borrowing equipment from Prescott Memorial Library, in the event they may need access to a computer, webcam, microphone, etc.
- Include installation instructions that feature: a link to the Help Desk knowledge base article on Setting up and Using Respondus LDB and A link to the download page: https://download.respondus.com/lockdown/download.php?id=958157667.
Course
- Include a fully-functioning practice exam (with unlimited attempts) in your course students can use to test the LockDown Browser and become comfortable with using it.
- Consider a small point value and due date for at least one initial practice quiz attempt to ensure students complete it before s real exam.
Exam
- Double check Respondus Dashboard settings for a quiz before it is scheduled to become available to students. This helps to ensure that everything is configured properly and catch errors that could allow students to access exams without the use of Respondus.
- Make sure to include time for addressing technical issues (setting up Respondus, troubleshooting, etc.) when you set the opening and closing times for your exam. Failure to do so could cause a student to not receive sufficient time on their exam if they experience technical difficulties.
Setup LockDown Browser in Canvas
- Create your quiz(es) or exam(s) normally in Canvas.
- Add the Respondus LockDown Browser Dashboard to your course.
- Navigate to the Course Dashboard in your Canvas course.
- Click the Edit blocks button.
- Select “Respondus LockDown Browser” from the Add a block menu.
- Click Turn editing off.
- Set the requirement in the Respondus LockDown Browser Dashboard.
- Navigate to the Course Dashboard in your Canvas course.
- Click the “Dashboard …” link under “Respondus LockDown Browser”.
- You will be taken to the About LockDown Browser page by default. Select “Continue to LockDown Browser” to proceed. You may also select the checkbox “Don’t show this page again” if you prefer to be taken directly to the dashboard in the future.
- Click the drop-down arrow next to the quiz for which you wish to enable LockDown Browser and click the “Settings” option.

- Click the radio button labeled “Require Respondus LockDown Browser for this exam”.
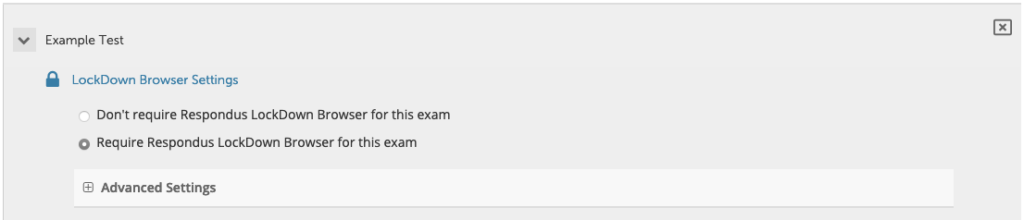
- Expand the Advanced Settings menu if you need to configure certain advanced behavior of the LockDown Browser – this includes the ability to allow the use of iPads or Chromebooks.
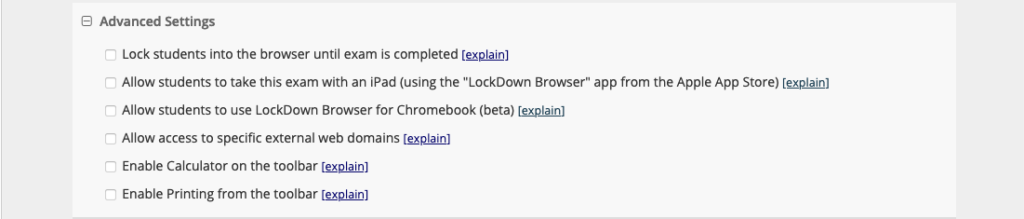
- Allow students to take this exam with an iPad (using the “LockDown Browser” app from the Apple App Store) enables students to use the LockDown Browser app on an iPad to take protected quizzes. This is disabled by default, and must be enabled by the instructor.
- enables students to use the LockDown Browser Chromebook extension to take protected quizzes. This is disabled by default, and must be enabled by the instructor. Keep in mind this option is considered “beta,” so it may not always function as expected for the time being.
- Allow access to specific external web domains enables students to open links from outside domains. By default, sites other than canvas.latech.edu or those included as a link in the exam are blocked. This provides an override to allow additional sites to be accessed. This is an infrequently used option.
- Enable Calculator on the toolbar allows students to have access to a scientific calculator during exams that is built into the LockDown Browser
- Enable Printing from the toolbar allows students to print and adds a print button to the toolbar. By default, LockDown Browser will prevent printing.
- The Proctoring section is used to configure exam proctoring. You can skip ahead to the next section Setup Proctoring with LockDown Browser to setup proctoring or select Don’t require proctoring for this exam if you do not plan to proctor the exam or would prefer to complete the setup later.

- Click the “Save + Close” button – Respondus LockDown Browser is now enabled for the exam.
Setup Proctoring with LockDown Browser
While LockDown Browser is a helpful tool for increasing the security of computer-facilitated exams, the potential for academic dishonesty still remains. To further protect academic integrity, it is desirable and recommended to use LockDown Browser in conjunction with one of three proctoring methods: automated, live remote proctoring, or in-person proctoring. This section will walk you through implementing these proctoring scenarios.
Automated Proctoring (w/ Respondus Monitor)
Automated proctoring is implemented using Respondus Monitor, an additional product licensed along with Respondus LockDown Browser. Monitor uses a webcam and microphone attached to the student’s computer along with machine learning to monitor an exam session and flag time periods in which an event requiring instructor review occurred. It is integrated into LockDown Browser, and does not require students to download additional software. As a result, Monitor is ideal for remote administration of exams – especially when sessions can occur at different times.
- Create your quiz(es) or exam(s) and setup Lockdown Browser as described in Setup Lockdown Browser in Canvas above.
- Enable the Respondus Monitor function for your quiz or exam.
- Navigate to the Course Dashboard in your Canvas course.
- Click the “Dashboard …” link under “Respondus LockDown Browser”.
- You will be taken to the About LockDown Browser page by default. Select “Continue to LockDown Browser” to proceed. You may also select the checkbox “Don’t show this page again” if you prefer to be taken directly to the dashboard in the future.
- Click the drop-down arrow next to the quiz for which you wish to enable Respondus Monitor and click the “Settings” link.
- Under Proctoring, select the radio button “Require Respondus Monitor (automated proctoring) for this exam“.

- You will be shown an About Respondus Monitor message by default after enabling Monitor for the first time. Select the checkbox “Don’t show this message again” if you do not want to see the message again and click the Continue to Respondus Monitor button.
- Configure settings for Respondus Monitor using the three sections: Startup Sequence, Facial Detection Options, and Advanced Settings
- Startup Sequence controls the events that are displayed to a student during the proctoring startup at the beginning of an exam.
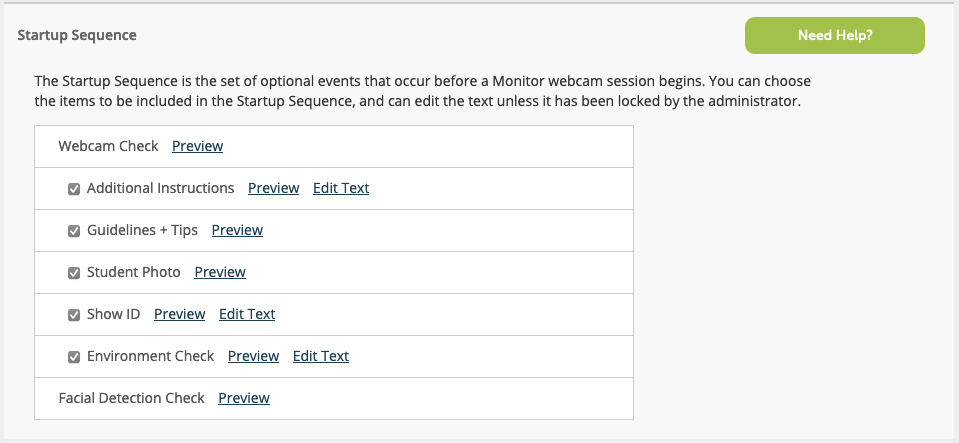 Webcam Check and Facial Detection Check are both required to verify the video proctoring function is working properly. Other events are used to provide the test-taker with information (Additional Instructions and Guidelines + Tips), verify the test taker’s identity (Student Photo and Show ID), or check the test environment for prohibited aids. These can be displayed at the instructor’s discretion.
 - Facial Dection Options are used to configure how the program should respond to failures with facial detection features.
 By default, Respondus will prevent students from starting the exam if their face cannot be detected and it will interrupt the exam if face detection fails while the exam is in progress. While not preferable, those can be disabled here in the event of trouble with the facial recognition feature.
 - Advanced Settings provides three additional features.
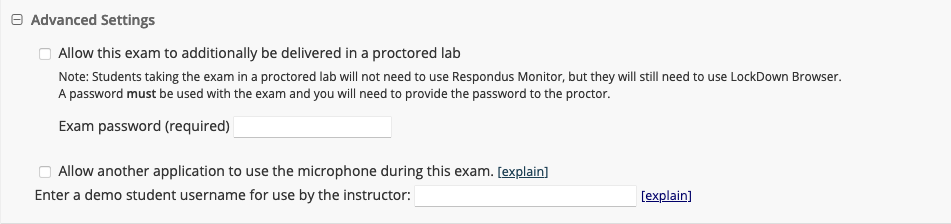 The first is the ability to require an exam password. This is helpful for when you want to be provide access to the exam using Respondus Monitor, but you also need to allow some students to take the exam with a live proctor (typically this is due to ADA accommodations). If you only want to use a live proctor, follow the guidance in Live In-Person Proctoring instead. Second, is the option to allow another application to use the microphone – this is not commonly used. Finally, there is the option to provide a demo student username for use by the instructor. This option exists so that teachers can test Monitor with their (or student accounts) without adversely affecting licensing.
- Startup Sequence controls the events that are displayed to a student during the proctoring startup at the beginning of an exam.
- Click the “Save + Close” button to save your settings.
Live Remote Proctoring (w/ Zoom)
Live remote proctoring is a new capability added to Respondus LockDown Browser. Live remote proctoring combines LockDown Browser with an existing teleconferencing solution (at Louisiana Tech, that will generally be Zoom). A webcam and microphone are required during the exam; however, it is up to the instructor to monitor audio and video and address any issues in real time. This approach ideal for simultaneous administration of exams; however it is only recommended for smaller classes (approximately 20 students at most). It is not suitable for large lecture classes.
Setup the Quiz
- Create your quiz(es) or exam(s) and setup Lockdown Browser as described in Setup Lockdown Browser in Canvas above.
- Enable the Respondus Monitor function for your quiz or exam.
- Navigate to the Course Dashboard in your Canvas course.
- Click the “Respodous Dashboard …” link under “Respondus LockDown Browser”.
- You will be taken to the About LockDown Browser page by default. Select “Continue to LockDown Browser” to proceed. You may also select the checkbox “Don’t show this page again” if you prefer to be taken directly to the dashboard in the future.
- Click the drop-down arrow next to the quiz for which you wish to enable Respondus Monitor and click the “Settings” link.
- Under Proctoring, select the radio button “Allow instructor live proctoring for this exam (via Zoom, Teams, etc)“.

- Configure settings for Instructor Live Proctoring
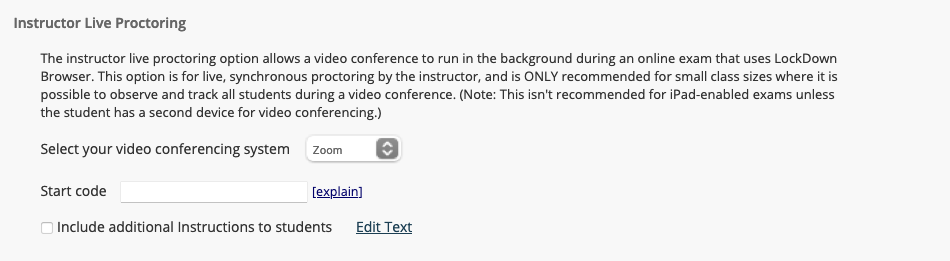
- Set Select your videoconferencing system to Zoom.
- For Start code, enter a password that you will give to students when you are ready for them to start the exam during the live session.
- Check Include additional instructions to students and click Edit text to provide any additional instruction you would like Respondus to present to students. Do not include the start code here, or students will be able to begin the exam without your permission.
- Click the “Save + Close” button to save your settings.
Ahead of the Quiz
- Communicate with students about how the test will work. Make sure they understand the limitations of the Zoom proctored approach – it will only work with Windows, Mac, or Chromebooks. iPads will not support Zoom proctoring, and students will need to arrange to have another device (compatible laptops are available from Prescott Memorial Library).
- It is recommended you have a test quiz day before administering a major exam. This will help you and the students become familiar with the process of starting an exam together, and discover any technical problems.
Starting the Quiz
- Start your normal class Zoom meeting.
- When you are ready to begin the exam, have students open the quiz. They must open the quiz from their normal web browser and allow the LockDown Browser to launch automatically.
- Once the quiz launches, students will not be able to proceed until you provide the Start code you configured when you setup the exam.
Live In-Person Proctoring
Live in-person proctoring is the form of proctoring that would be utilized in a classroom or computer lab with an instructor or proctor monitoring the exam administration. In this case, LockDown Browser is used only to prevent switching applications during the exam, while the exam administration is monitored by someone in the room. It does not require any special equipment other than a computer with LockDown Browser installed.
For this approach it is best to leave Monitor disabled. You can repeat the steps in Setup Proctoring with LockDown Browser above, leaving Proctoring set to Don’t require proctoring for this exam.
To prevent students from beginning the exam early, you will want to use features built into Canvas to require a password to start the exam.
- Navigate to the quiz through Canvas and open the Edit settings page by clicking on the pencil icon on the quiz card or by opening the quiz then using the Administration menu to go to Quiz administration > Edit settings.
- In the right-hand column of collapsed options, expand the Extra restrictions on attempts section.
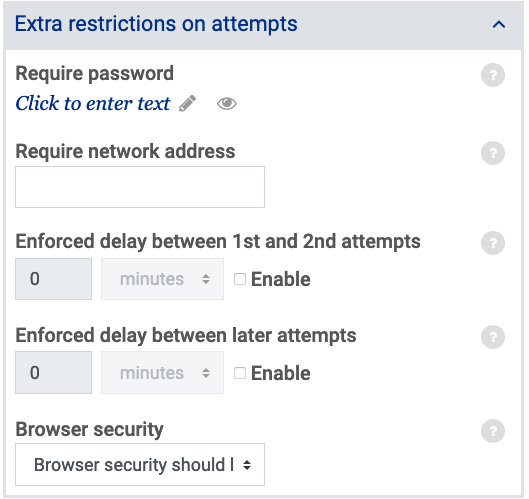
- Under Require password, click Click to enter text and enter the password you want to use to start the exam.
- Save changes by clicking Save and return to course or Save and display at the bottom of the page.